Create First Instance
The following guide will take you through the steps necessary to start your first virtual machine instance.
Prerequisites:
- Up-to-date web browser
- Active account, see Accessing G2 Ostrava site and Accessing G2 Brno site
- Basic knowledge of SSH (for remote connections)
- API key and CLI client (needed only if You want to use CLI)
Sign In
The dashboard is available at https://dashboard.cloud.muni.cz or https://horizon.ostrava.openstack.cloud.e-infra.cz or https://horizon.brno.openstack.cloud.e-infra.cz.
Note
International users may choose EGI Check-in, DEEP AAI or LIFESCIENCE AAI, depending on their membership in these projects.
1. Select e-INFRA CZ federation in G2 Ostrava and G2 Brno site.
2. Click on Sign In.
Example

3. You will be redirected to ds.eduid page, where you select your institution from the drop-down list.
Example

4. Provide your institution-specific sign-in credentials.
5. Wait to be redirected back to our dashboard.
Tip
When searching for your institution you can use the search box at the top.
Create Key Pair
All virtual machine instances running in the cloud have to be accessed remotely. The most common way of accessing an instance remotely is SSH. Using SSH requires a pair of keys - a public key and a private key.
Note
Prefer using this method if possible. It is the most secure one, since your private key is kept on your local machine at all times.
Note
You will need the ssh-keygen command present on your machine. It is available as a part of SSH-related
packages in most Linux distributions:
- Debian / Ubuntu:
openssh-client - RHEL / Fedora:
openssh - Archlinux:
openssh
Use the ssh-keygen command to create a new pair of private and public keys:
ssh-keygen -t rsa -b 4096 -f ~/.ssh/id_rsa_my_cloud_key1You will be asked to specify the output file and passphrase for your key.
Assuming your ssh public key is stored in ~/.ssh/id_rsa_my_cloud_key1.pub:
openstack keypair create --public-key ~/.ssh/id_rsa_my_cloud_key1.pub my_cloud_key1Refer to the example of Key Pair creation within VM provisioning CLI example.
Danger
Prefer using the CLI method unless you have no other choice, e.g., you lack access to a local machine
with the ssh-keygen utility.
The GUI method requires you to create your private key on a remote machine and transfer it over a network.
Although both the remote machine and the network transfer should be secure, there is always some risk
of a security breach, which could expose your private key to a malicious party.
1. Navigate to Project > Compute > Key Pairs and click the Create Key Pair button.
Example

2. In the Create Key Pair insert the Key Pair Name. Avoid using special characters, if possible. Next select SSH key for Key Type and finally confirm with Create Key Pair.
Example

3. Download the private key to your local computer and move it to the ~/.ssh/ folder. If you are using Windows, refer to Accessing From Windows.
4. Set access privileges on ~/.ssh/ folder:
chmod 700 .ssh/
chmod 644 .ssh/id_rsa.pub
chmod 600 .ssh/id_rsa
Update Security Group
In MetaCentrum Cloud, all incoming traffic from external networks to virtual machine instances is blocked by default. You need to explicitly allow access to virtual machine instances and services via a security group.
You need to add at least one new rule to be able to connect to your new instance (or any instance using the given security group). This is similar to setting up firewall rules on your router or server. If set up correctly, you will be able to access your virtual machine via SSH from your local terminal.
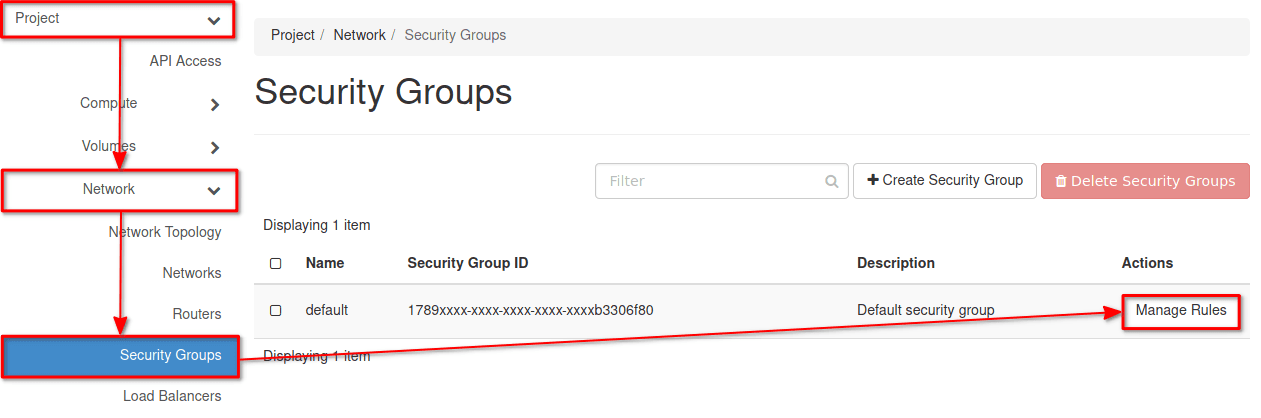
1. Go to Project > Network > Security Groups. Click on Manage Rules, for the default security group.
Example
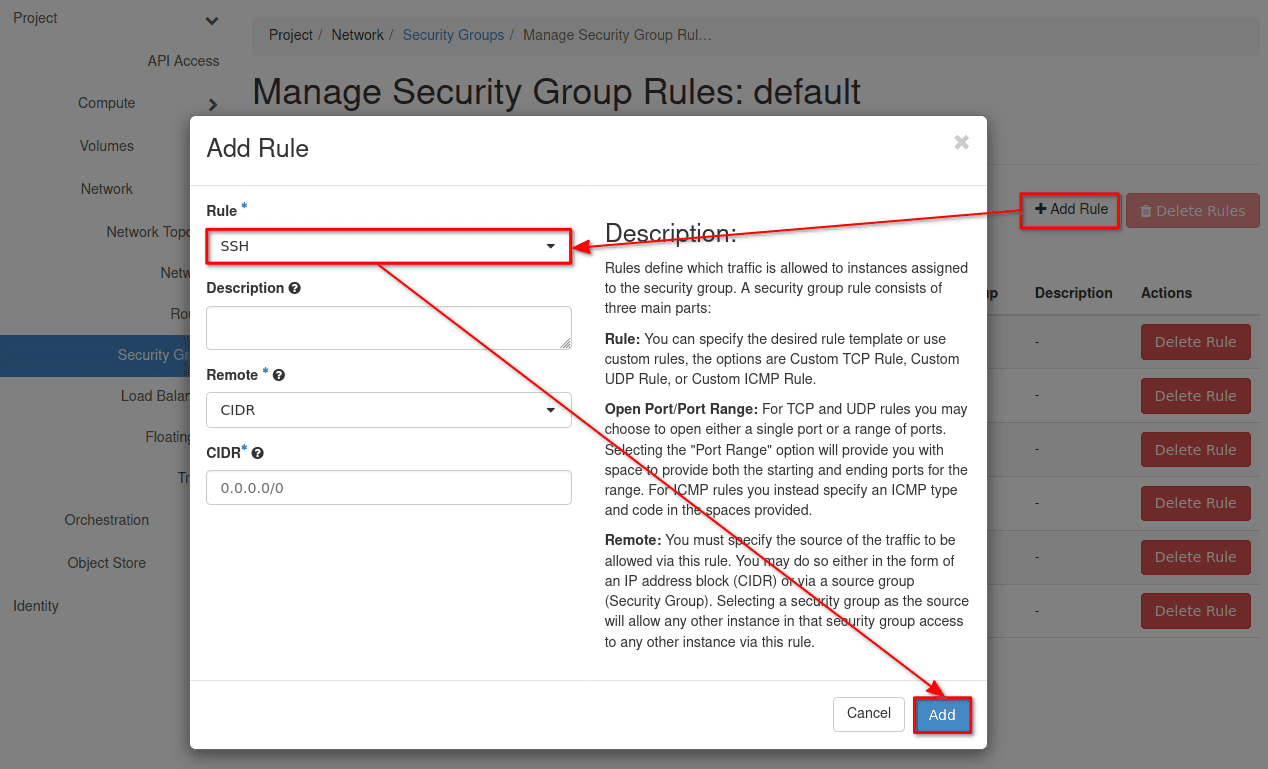
2. Click on Add rule, choose SSH, and leave the remaining fields unchanged. This will allow you to access your instance via IPv4.
Example
Caution
You have 2 possibilities for how to configure security groups policy.
- One is through CIDR which specifies rules for concrete network range.
- The second one specifies rules for members of a specified security group, i.e. policy will be applied on instances that belong to the selected security group.
For details, refer to the official documentation.
1. Add SSH rule to the default security group:
openstack security group rule create --description "Permit SSH" --remote-ip 0.0.0.0/0 --protocol tcp --dst-port 22 --ingress defaultOptionally, add ICMP rule (to allow ping):
openstack security group rule create --description "Permit ICMP (any)" --remote-ip 0.0.0.0/0 --protocol icmp --icmp-type -1 --ingress default2. Verify:
openstack security group show defaultCreate a Virtual Machine Instance
1. In Compute > Instances, click the Launch Instance button.
Example

2. Choose Instance Name, Description, and number of instances.
If you are creating more instances, -%i will be automatically appended to the name of each instance. Continue via Next.
Example

3. Choose an image from which to boot the instance. Choose to delete the volume after instance delete. This is not recommended for production deployment.
Example

4. Choose the hardware resources of the instance by selecting a flavor. Additional volumes for data can be attached later on.
Example

5. Select appropriate network based on your project type and continue to Key Pair in the left menu.
For personal project select personal-project-network-subnet from network 147-251-115-pers-proj-net.
Here is more information on available networks in Ostrava G2 and Brno G2.
Example

For group project select group-project-network-subnet from network group-project-network (check if Router gateway is set).
Example

6. In Key Pair select the key that was created in section Create Key Pair in the Available list and finally Launch Instance.
Example

1. Create volume
Volumes are created automatically when creating an instance in GUI, but we need to create them manually in the case of CLI.
Create bootable volume from image (e.g. centos):
openstack volume create --image "centos-7-1809-x86_64" --size 40 my_vol1To get a list of available images:
openstack image list2. Create instance
openstack server create --flavor "standard.small" --volume my_vol1 \
--key-name my-key1 --security-group default --network 147-251-115-pers-proj-net my-server1
To get a list of available flavors:
openstack flavor listIn case of a group project use --network group-project-network.
Associate Floating IP
Floating IP is the OpenStack name for a public IP. It makes the instance accessible from an external network (e.g., the Internet).
At this point, you want to Allocate IP Address and Assign IP Address. You don’t have to care about the other sections unless you need them.
Possible IP address pools are described separately for Ostrava G2 and Brno G2.
For group projects, always select the same network as used in Router gateway.
Login
Login using your SSH key as selected in Key pair above.
Connect to the instance using ssh username@floating-ip.
usernamediffers based on the selected image (“ubuntu”, “debian”, “centos”, “almalinux”). The username topic is also discussed in FAQ.floating-ipis the one previously associated.
More information about login options is described on the Accessing Instances page.
Refer to complete example of creation VM and its components.
For details, refer to the official documentation.
Last updated on